Your ultimate resource for mastering the Pier2pier.com software
Whether you're a seasoned user or just getting started, this guide will help you navigate the features and functionalities of Pier2pier.com with ease.
Open Video Guide Request DemoPier2pier 3D load calculator solution℠ built for cold chain logistics.
The cold chain specific benefits include:
✔ Optimal Space Utilization: in cold chain logistics, maximizing container, dry ice and temperature-controlled packaging boxes space is crucial. Efficient packing reduces the need for extra containers or storage facilities.
✔ Preservation of Product Quality: Our algorithm can be used to arrange items in containers to minimize temperature fluctuations, preserving the quality of sensitive products during transport and storage.
✔ Reduced Transport Costs: Well-packed containers lead to more efficient transportation, reducing costs, especially for specialized handling of temperature-sensitive products.
✔ Enhance Inventory Management: Packing optimization aids inventory planning, reducing stockouts or excess inventory, improving cost savings.
✔ Minimized Packaging Waste: Efficient packing reduces the need for excess packaging materials, contributing to sustainability efforts and reducing environmental impact.
Pier2pier C02 and Distance Calculator℠
Logistics professionals can track and report on transportation environmental performance using a Distance-CO2 Estimator, supporting organizational sustainability goals.
Pier2pier Track and Trace solution℠
Real-time air freight tracking ensures streamlined logistics operations, consolidating all air freight information in one accessible platform, eliminating the need for manual searching.
Trusted by industry users such as Teva Pharmaceuticals
Senior Logistics Manager, Teva Pharmaceuticals
"Absolutely satisfied with the 3D load calculator and it is helping a lot"
Pier2pier 3D load calculator solution℠
✔ Gain confidence in your export readiness and testing processes to maintain a continuous focus on value-added activities, resulting in improved business outcomes.
✔ Maximize operational efficiency with Pier2pier's 3D Load calculator, achieve significant time savings in load planning tasks.
✔ Optimal Space Utilization: the solution will maximize container, space for any form of equipment you are exporting with for example any standard container or trailer. Efficient loading reduces the need for extra containers.
Pier2pier Track and Trace solution℠
Get the updates you require with the Pier2pier track and trace solution. Work more efficiently on one platform instead of multiple.
| Email Notifications | Configure email alerts to stay updated on deliveries, ensuring informed decisions. |
| Real-Time Status | Gain real-time access to container, vessel, AWB, and courier updates from any location, at any time. Say goodbye to uncertainty and take control of your shipments' precise location and status. |
| ETA Sharing | Share real-time tracking status and ETA with stakeholders for seamless collaboration across the supply chain. |
Pier2pier 3D load Calculator Solution℠
Maximize operational efficiency with Pier2pier's unified calculator, achieve significant time savings in load planning tasks, facilitating quicker decision-making and smoother workflows. Maximizing Cargo Capacity, optimize cargo space effortlessly with Pier2pier's 3D load calculator. Ensure every inch is utilized efficiently.
Gain confidence and test processes to maintain a continuous focus on value-added activities, resulting in improved customer and business outcomes.
Pier2pier C02 and Distance Calculator℠
Transform your logistics with Pier2pier's cutting-edge calculator, empowering you to lead in sustainability and efficiency. Make informed decisions and streamline workflows effortlessly.
Pier2pier Track & Trace solution℠
Get the updates you require with the Pier2pier track and trace solution. Work more efficiently on one platform instead of multiple.
| Email Notifications | Configure email alerts to stay updated on deliveries, ensuring informed decisions. |
| Real-Time Status | Gain real-time access to container, vessel, AWB, and courier updates from any location, at any time. Say goodbye to uncertainty and take control of your shipments' precise location and status. |
| ETA Sharing | Share real-time tracking status and ETA with stakeholders for seamless collaboration across the supply chain. |
Pier2pier world map solution℠
Explore the global landscape of container ports, rail terminals, and depots through our interactive World Map, empowering you with a visual understanding of key logistical hubs and their connectivity.
Pier2Pier transport route solution℠
Discover niche transportation routes through the Pier2Pier transport route solution.
| Optimized Routing | The Pier2Pier transport route solution enables sea freight forwarders to discover niche transportation routes, helping them optimize their routing strategies. |
| Risk Mitigation | Diversifying transportation routes through Pier2Pier allows sea freight forwarders to mitigate risks associated with unforeseen events, such as the red sea crisis. |
| Enhanced Customer Satisfaction | Discovering and utilizing efficient routes can contribute to improved delivery timelines and reliability. |
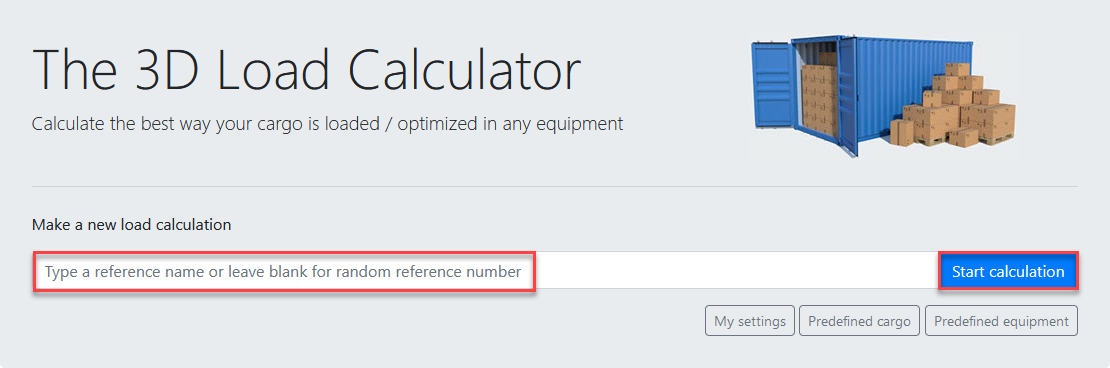
On the start page it shows multiple options. To start a new calculation type in your reference and click start calculation.
▷ Customized settings and pre-defined cargo + equipment
Remember to go all the way down at the bottom of the page and click [Save My Settings]
The [Predefined cargo] button is a tool where you can change the dimensions of your already existing cargo.
The [Predefined equipment] button is a tool where you can change the dimensions of your already existing equipment.

▷ Limitation of the trial period
Users on the Pier2pier.com trial period will not have the facility to add “predefined cargo” and “predefined equipment”.
The sole functionality that will be offered is "My settings" as pictured, this allows you to set the load calculator to your own pre-set requirements e.g. if you want to use metric over imperial.

Furthermore, all product dimensions entered onto the load calculator will not be saved during the trial period.
▷ Saved calculations
You would be able to find old calculations created by you or your colleagues.
Use the search box marked with red and type in the reference name to find the calculation you are looking for. You can now click on the [Edit loading] button to see the old calculation.

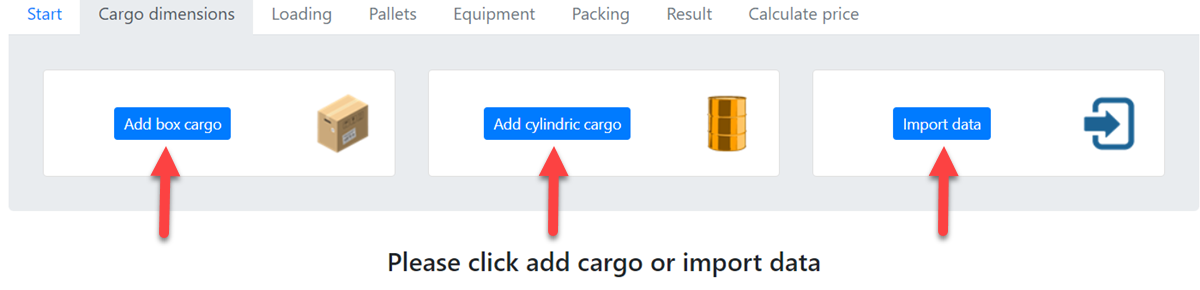
There are 3 ways to add your cargo – you can add box or cylindric cargo or use our [Import data] button.
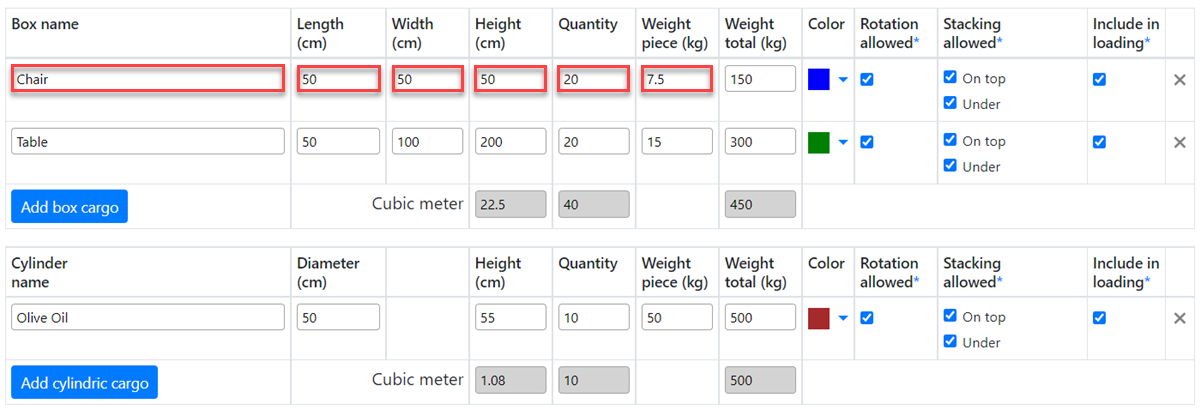
To make a new box cargo, type in the cargo name and the dimensions of the box and the same goes for cylindric cargo.
To use the [Import data] feature click on it, and you will be seeing this picture.
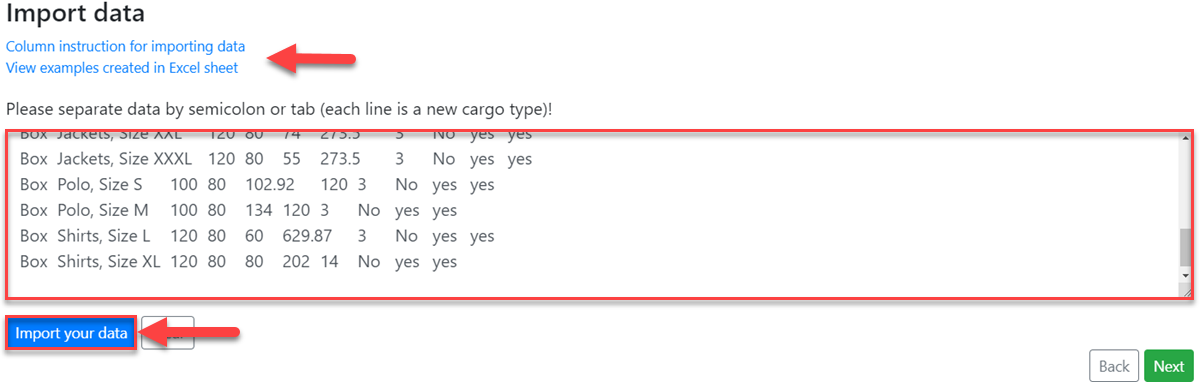
If you click one the Column instruction text, you will be able to see how to set it up and the same goes for the excel sheet.
In the excel sheet you will be finding an example on how to do it and a box/cylindric cargo template.
You just need to copy and paste the text from the excel sheet into the box marked with red as shown and then click [Import your data]
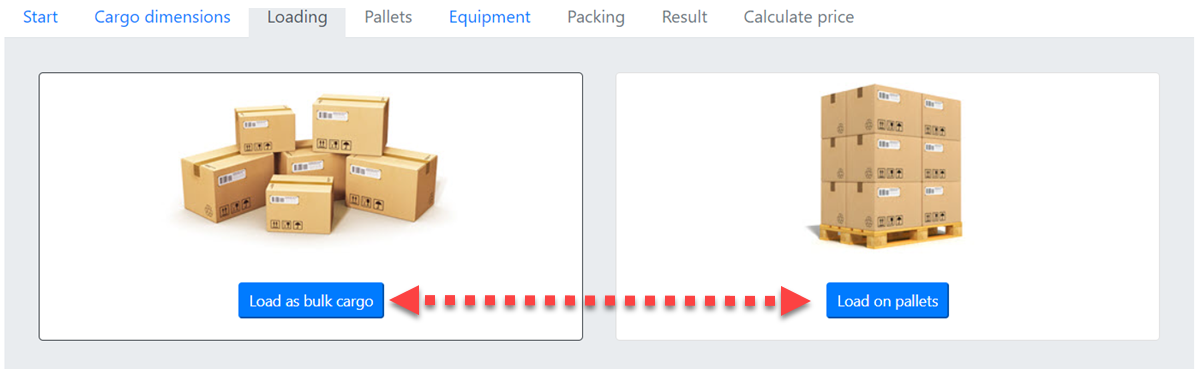
On the Loading page is where you choose how to load your cargo
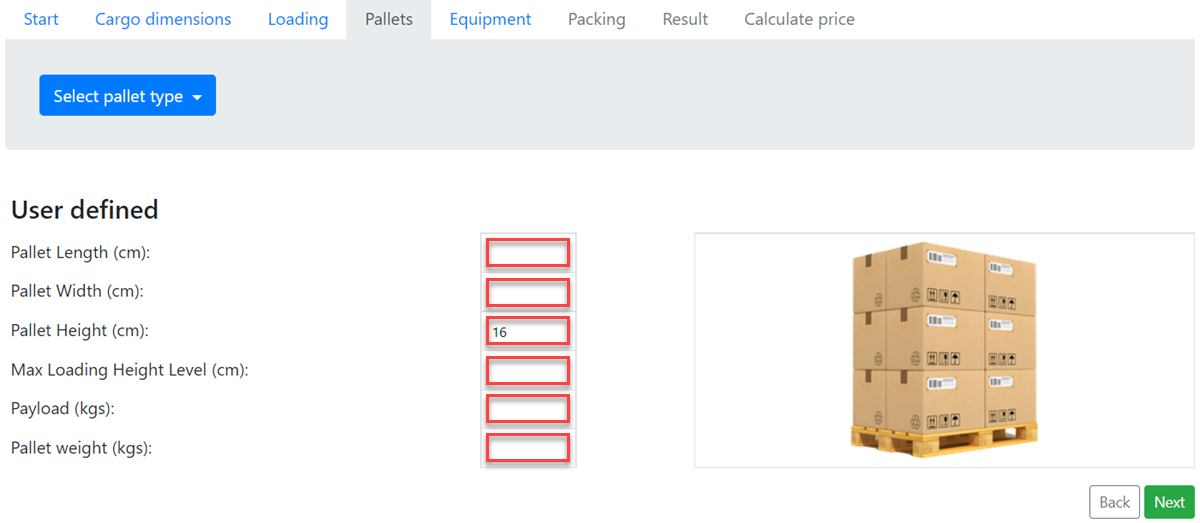
On the pallets page you can choose which pallet you are going to use.
Click [Select pallet type] and you will be able to choose between:
If you want to create your own pallet size, choose [User defined] and then just type in the dimensions of your pallet.
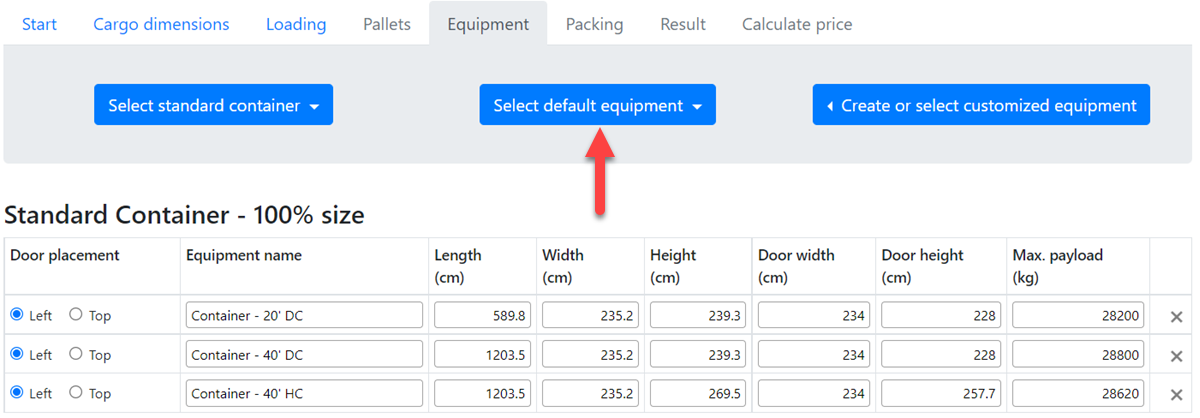
On the equipment page is where you would be able to select which equipment you’re going to use.
If you click on [Select default equipment] you will find all the normal containers/trucks.
You would also be able to click [Create or select customized equipment] where you can create your own equipment or choose the equipment you or your company made in the past.
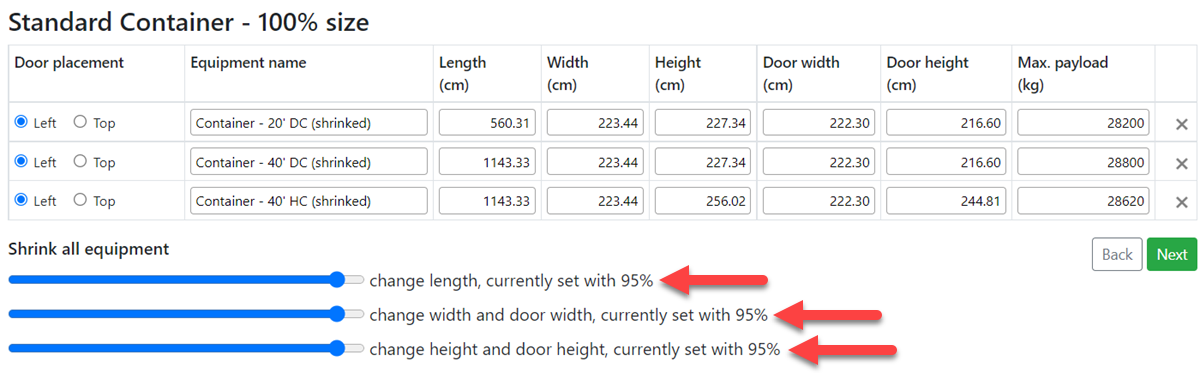
To make new equipment just type in the dimensions as shown on the picture.
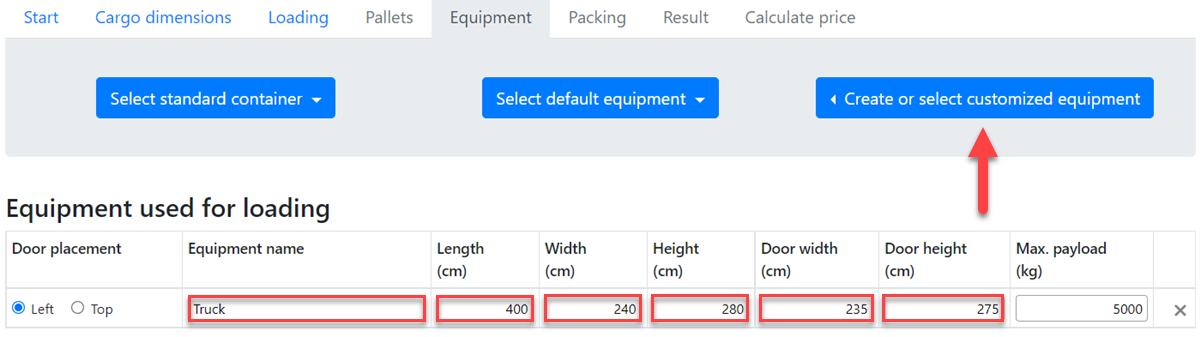
You can also shrink your equipment with percentage, as shown on the picture I chose to use 95% of my equipment’s space.
On the packing page you got 4 options:
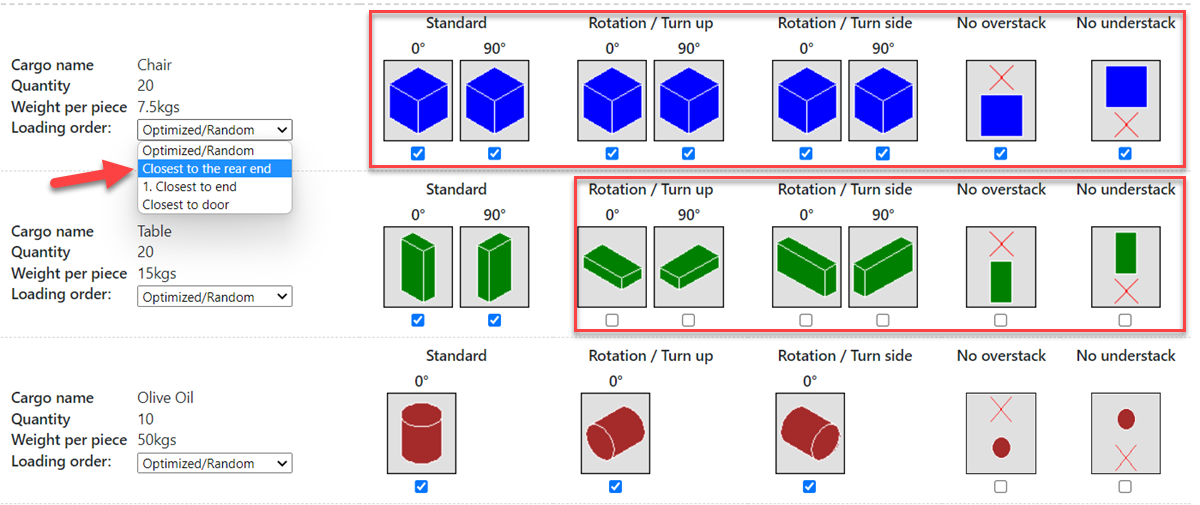
On the picture the blue boxes are not allowed to overstack/understack and the loading order is set to closest to rear end, and the green boxes aren’t allowed to rotate.
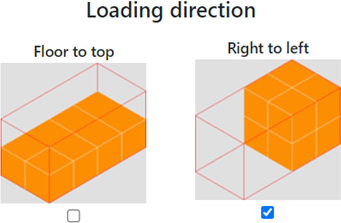
You can also change the loading direction between right to left or for floor to top.
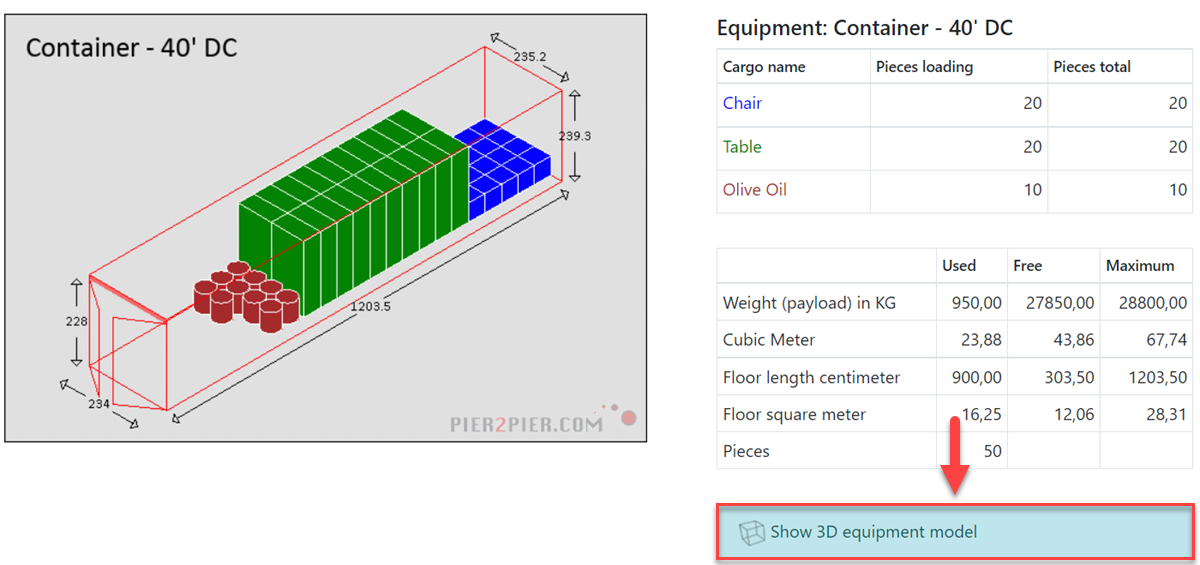
In the result page it shall allow creation of a packing report just click on the button [Create PDF packing report].
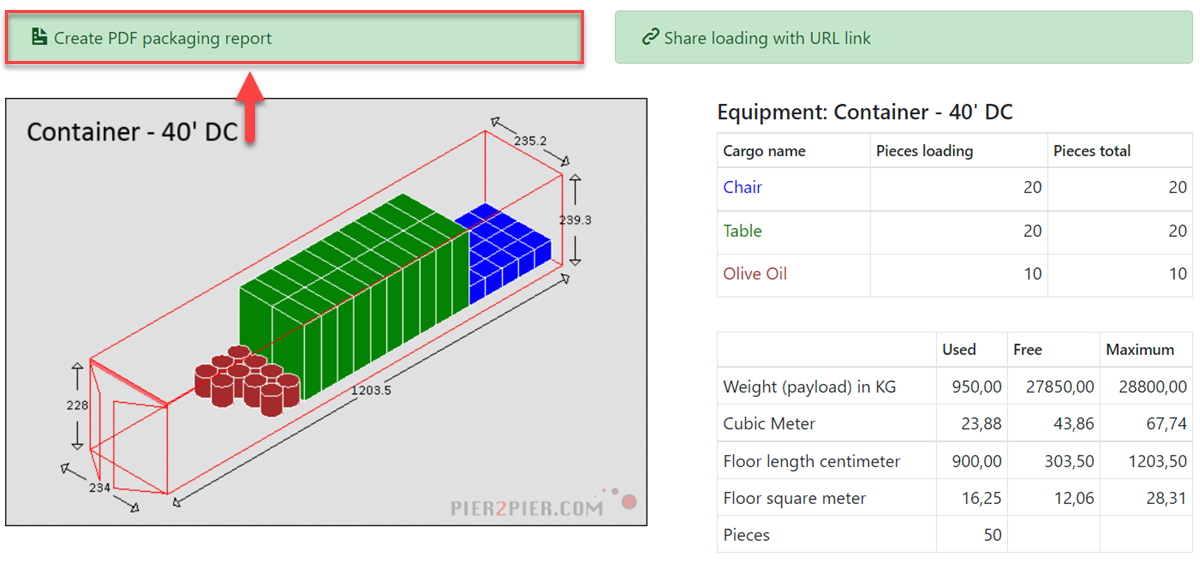
You can also open a 3D model of your calculation by clicking on the button [Show 3D equipment model].
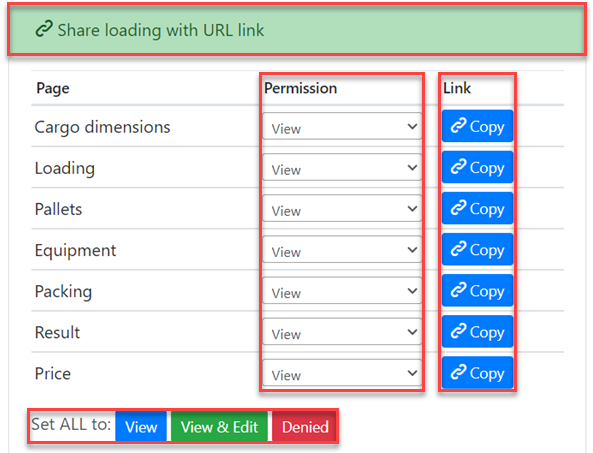
If you would like to be able to share your calculation with colleagues or clients, click on the [Share loading with URL link] button. Just set the permissions page by page or use the set all option and then just click on copy and paste into a message.
You will find the track and trace option on the main page. You can track container, vessels, air freight and couriers.
To start tracking a container just type in your container number and click track.
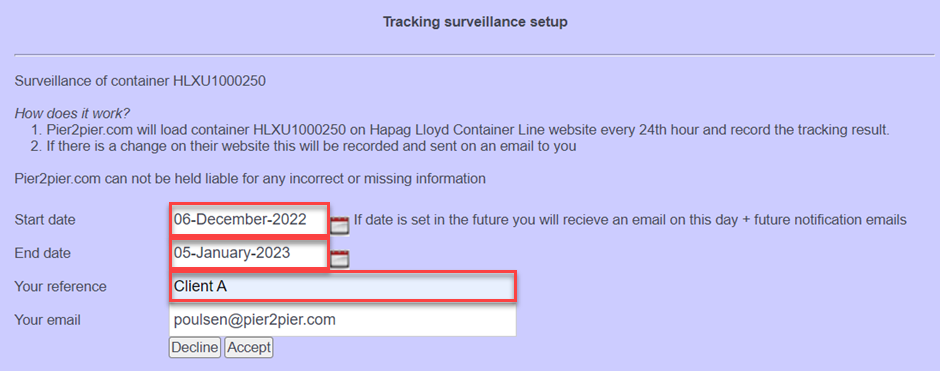
When you track a container, you will be able to see which shipping line you’re using and the tracking information. Up in the top right-hand corner, you will be able to setup container surveillance.
Container surveillance is a way for you to receive an email with any major updates or changes for example a change in the ETA (Estimated Time of Arrival)
You will also only be able to receive 1 update per 24 hours, if there are no updates you won’t receive an email.
Now just select a start date and an end date and type in your reference for this container
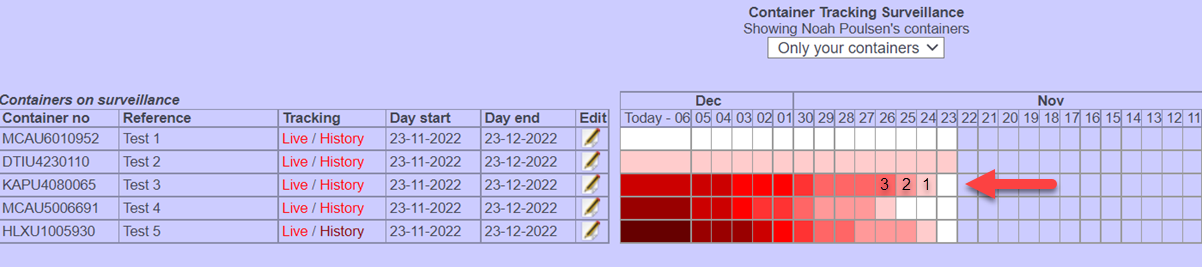
When returning to the main page, it shall show the Track & Trace Surveillance optionality under the most popular in the top left-hand corner.
On the Track & Trace Surveillance site you will be able to find all the container you currently have on surveillance, and which you no longer have.
The colors shows you which date you started tracking your container and which days you received an email. Each time the color change to a darker color you can see that you received an email.
Type in your vessel name and click track.
You will only be able to track container vessels and Ro-Ro vessels.
When you tracked your vessel, you will get provided with:
The red line shows you the route it’s just been on.
All the orange dots are radio transmitted signals coming of the vessel.
You can track air freight, just type in your MAWB (Master Air Waybill) number and click track.
To track couriers, type in your courier number and click track. You will only be able to track shipments from DHL, UPS, FedEx and TnT.
At the top of the main page there is a tool called Transport Route.
The Transport Route tool is a way for you to figure out which carrier's that have a possible route going from seaport to seaport.
To get started, type in the seaport (A) and seaport (B) it could for example be Hamburg to Singapore and then click search.
Once selected the system shall provide with a list over carriers, we detected that had a previous route going from A to.
What will also be provided is a list of carriers that have routes going from both ports but that are not verified sailing from A to B.
If you scroll further down, you will be seeing all vessel routings and transit time on the different routes.
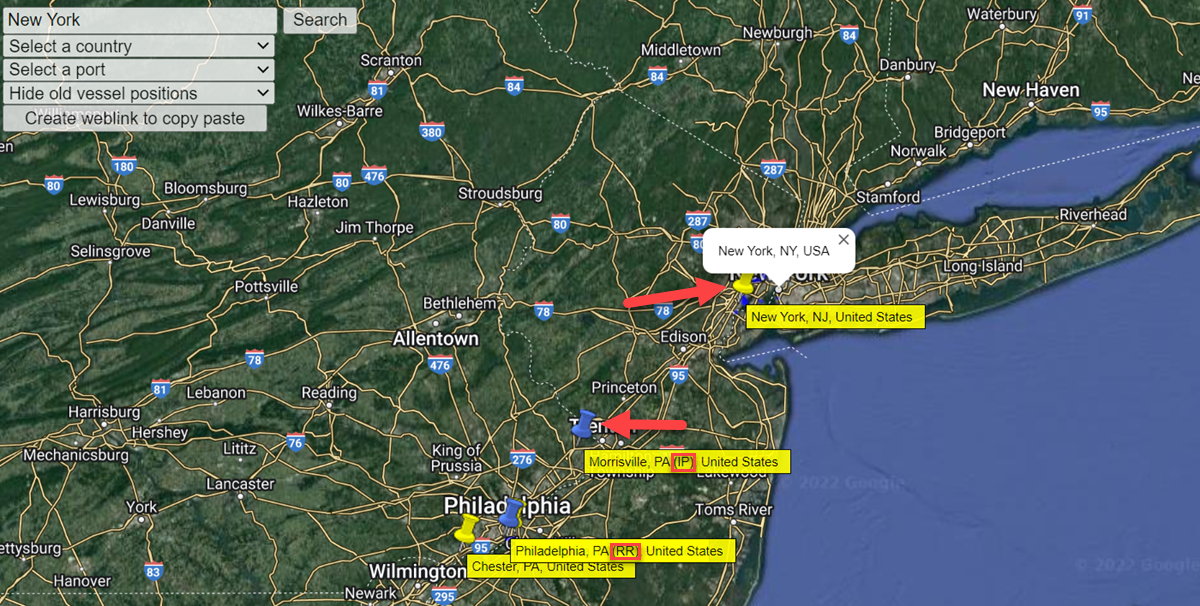
The World Map tool is a google maps-based world map where you would be able to search for seaports, rail ramps and inland ports.
You can for example search for a specific location to find the nearest seaport.

Seaports is marked with yellow pins. Rail ramps and inland ports is marked with blue pins. (RR) is rail ramps, and (IP) is inland ports.
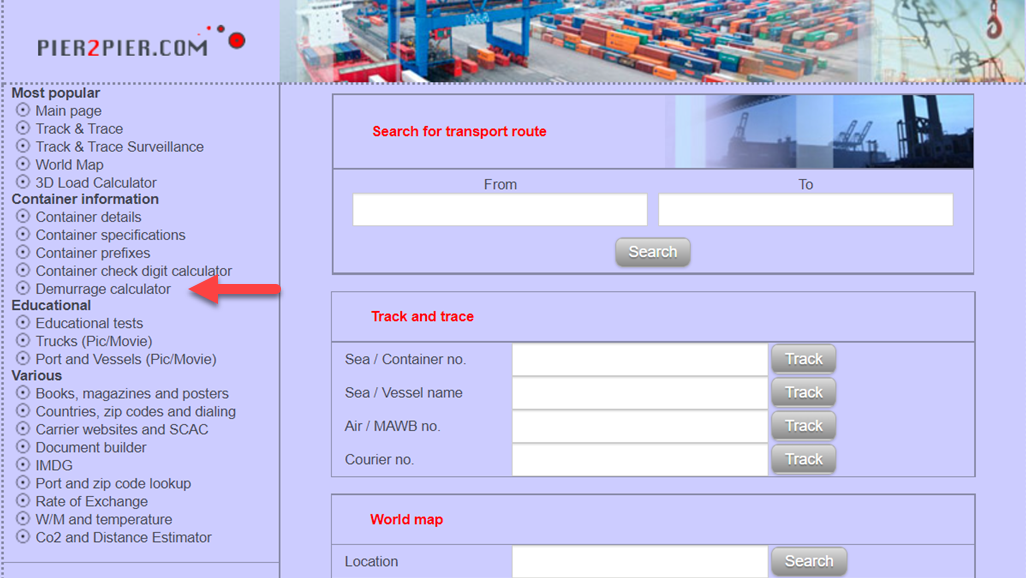
The Demurrage calculator is a tool to figure out how many days have been going by since your container have arrived in Demurrage or detention.
You would also be able to figure out how much you need to charge or pay.
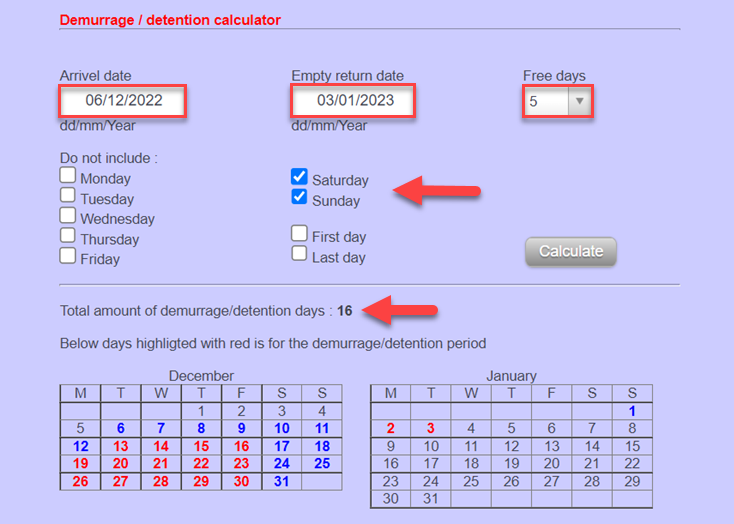
Choose your arrival date and Empty return date.
Choose how many days you got for free and which days you won’t be charged for and now click calculate.
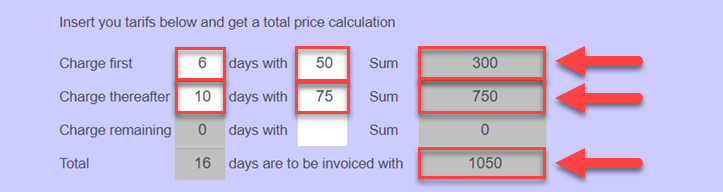
As seen listed below is where it can be set the charge for each given day.
The first 6 days shall cost 50 USD and the next 10 days shall cost 75 USD.
The document builder tool is where you would be able to create different kinds of documents.
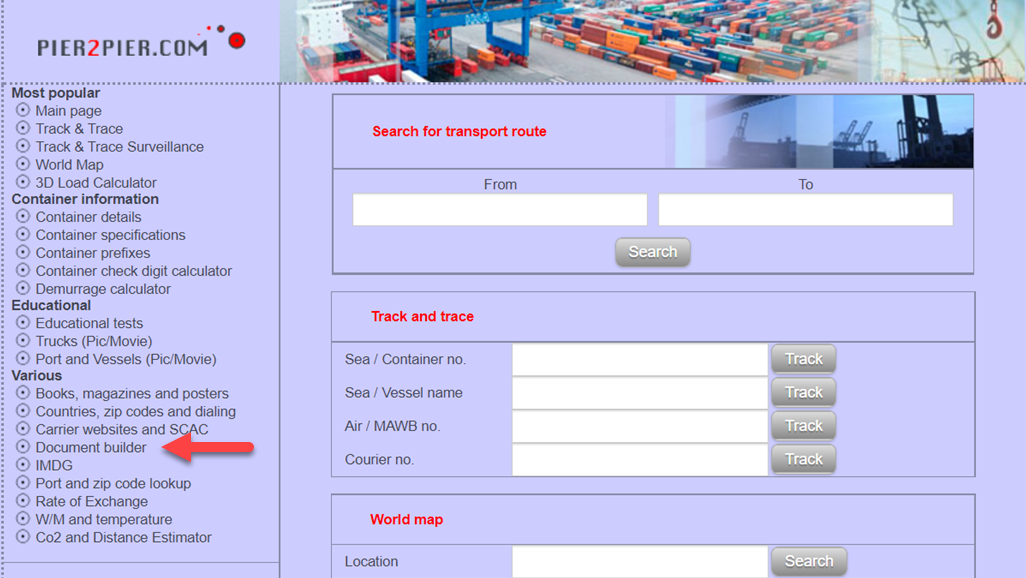
To create different kinds of documents, choose one from the list.
If you don’t see the document template you need to fill, please contact us all documents can be created.
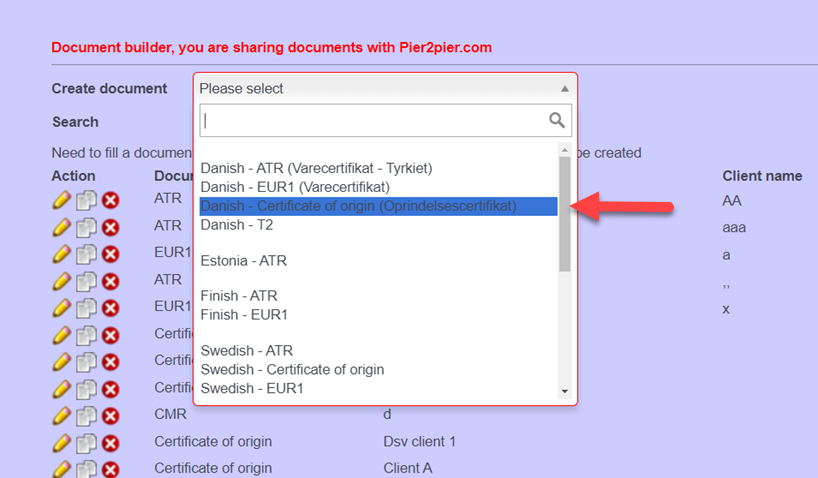
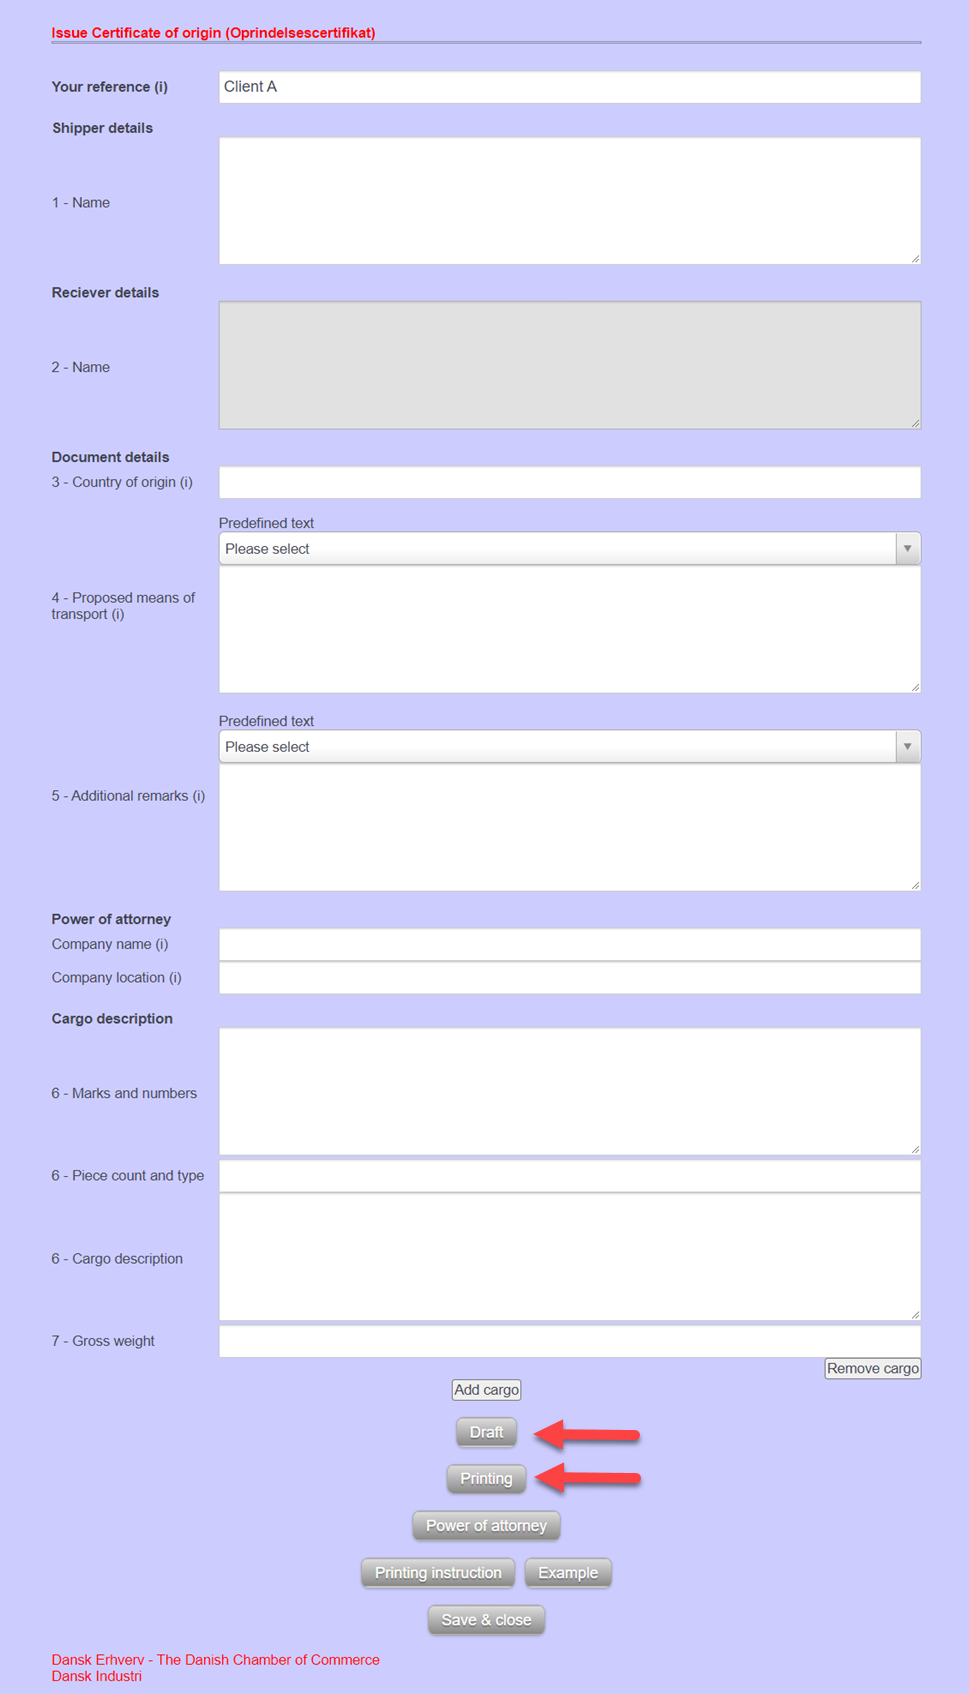
Once selected Danish Certificate of origin, you will get the template and then fill out the document. In the bottom you would be able to create a draft or printing ready document.
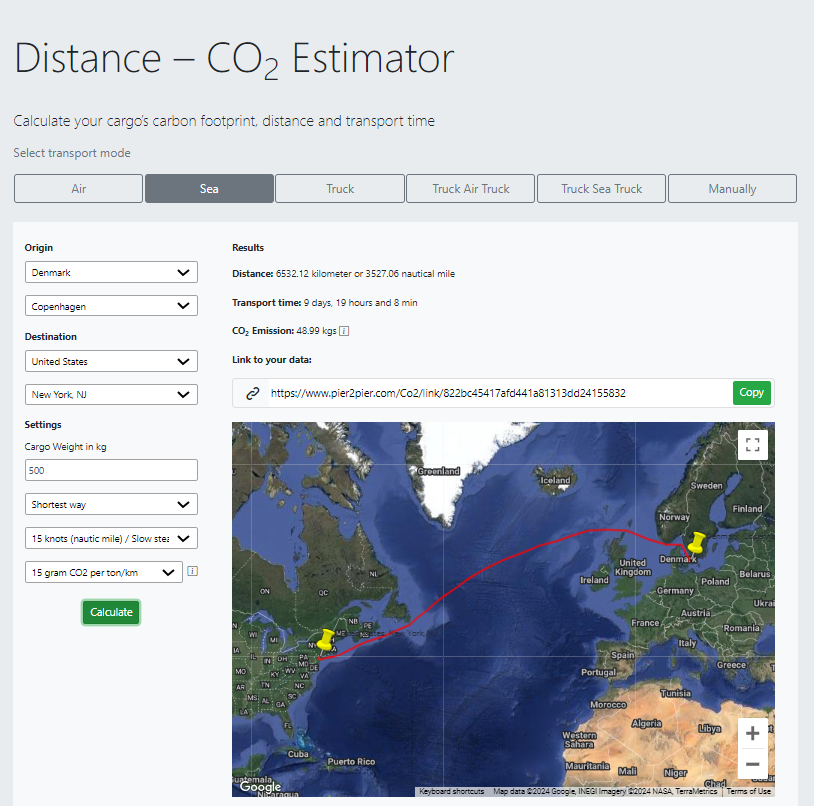
CO2 and Distance Estimator is a tool to find the CO2 pollution and distance from point A to B.
Choose the transport mode between air freight, sea freight, truck, or Door2Door.
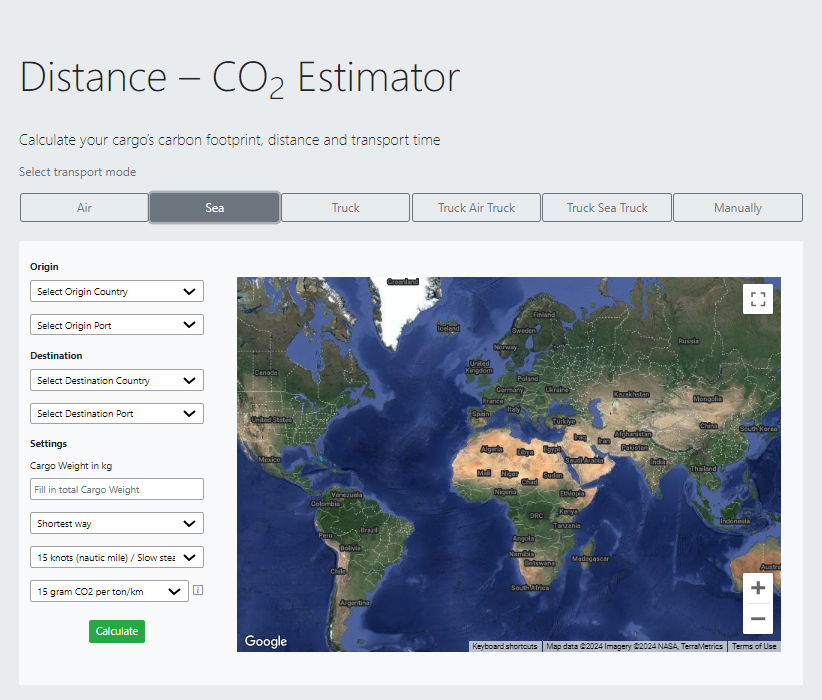
Below is an example of how it works with sea freight:
Choose the route Copenhagen to New York then select 500kgs in cargo weight.
Click calculate and below that you will now find the distance between the two ports and the CO2 levels.
Pier2pier.com’s Track and Trace solution is an advanced logistics platform that consolidates real-time data from numerous global shipping lines, enabling businesses to efficiently track shipments across various carriers. This provides users with a holistic view of their supply chain operations and ensures transparency at each stage of the shipping process.
How does Pier2pier.com help track shipments in real-time?Pier2pier.com's platform aggregates real-time shipment data from shipping lines worldwide, allowing users to monitor shipments through key identifiers such as container numbers, vessel names, and MAWB (Master Air Waybill) details. By offering live updates, it provides detailed information on location, estimated arrival times, potential delays, and other critical milestones along the shipment's journey.
Who are the leaders in freight tracking and trace solutions?The leaders in freight tracking and trace solutions include companies like Pier2pier.com, Project44, and FourKites. These platforms utilize real-time data integration, advanced predictive analytics, and seamless connectivity with carriers to offer comprehensive visibility into the movement of freight. Pier2pier.com stands out in providing an intuitive and accurate track-and-trace solution tailored to the needs of freight forwarders and logistics professionals, ensuring real-time insights and enhanced operational efficiency.
What shipping line data does Pier2pier.com Track and Trace provide?The system delivers comprehensive shipping data, including the current location of containers, arrival times, potential delays, and other key points along the shipment's route, such as customs clearance, port arrivals, and expected delivery dates. This helps businesses keep a pulse on their logistics operations and anticipate challenges.
How accurate is the data in Pier2pier.com's tracking solution?Pier2pier.com ensures high accuracy in tracking by pulling real-time data directly from global shipping lines. The platform relies on trusted carriers to provide up-to-date information, making it highly reliable for businesses seeking precise shipment status details.
How can I track multiple shipments with Pier2pier.com?The platform features a unified dashboard, enabling businesses to simultaneously track multiple shipments. Users can quickly view status updates for all their shipments, reducing manual tracking efforts and improving operational efficiency.
Does Pier2pier.com integrate with existing logistics systems?Currently, Pier2pier.com does not offer direct API integrations with external logistics systems. However, businesses can still leverage its powerful dashboard to track shipments manually and make use of its reporting features for improved visibility.
Which shipping lines are supported by Pier2pier.com's Track and Trace solution?Pier2pier.com supports a wide range of global shipping lines, including major carriers like Maersk, MSC, CMA CGM, and many others, providing extensive international and domestic coverage. This enables businesses to track shipments across different carriers seamlessly.
What features are available with Pier2pier.com’s shipment tracking?The platform includes features such as real-time shipment tracking, automated delay alerts, multi-shipment management, historical data, customizable reporting, and integration with shipment planning tools. This comprehensive suite enhances businesses' ability to monitor logistics effectively and make informed decisions.
Can I monitor the condition of my shipment with Pier2pier.com?Currently, Pier2pier.com does not offer environmental condition monitoring for sensitive cargo, such as temperature-controlled shipments. It focuses primarily on shipment location and status updates.
How often is shipment data updated in Pier2pier.com?Shipment data is updated daily, ensuring that businesses receive the most current information available regarding their shipments. The system provides frequent updates on key milestones and arrival estimates to help users stay informed.
Can I access historical shipment data through Pier2pier.com?Yes, Pier2pier.com maintains an archive of historical tracking data, enabling businesses to analyze past shipments, assess performance metrics, and optimize future logistics strategies.
Can I customize tracking alerts with Pier2pier.com?Yes, users can create customized alerts to notify relevant stakeholders about shipment status changes, including potential delays or arrivals. This feature ensures proactive communication and better operational response.
Can Pier2pier.com track shipments internationally?Yes, Pier2pier.com supports international shipment tracking, enabling businesses to track shipments across global carriers and air freight providers, offering unparalleled visibility on a worldwide scale.
How does Pier2pier.com improve shipping visibility?By integrating data from multiple carriers into one platform, Pier2pier.com eliminates the need for separate tracking systems, offering businesses a unified view of all their shipments. This consolidated approach provides superior visibility, enhancing logistics management and operational efficiency.
How easy is it to use Pier2pier.com’s Track and Trace solution?Pier2pier.com is designed to be user-friendly, with an intuitive interface that minimizes the need for extensive setup, training, or change management. Businesses can quickly start tracking shipments without complex processes.
Can Pier2pier.com track shipments based on booking references?No, Pier2pier.com currently supports tracking via container numbers, vessel names, and MAWB only. This method has proven to be the most efficient and reliable in the industry.
What is the benefit of using Pier2pier.com Track and Trace for my business?Pier2pier.com enhances operational efficiency by offering real-time tracking, visibility across multiple carriers, and predictive insights. This helps businesses reduce delays, optimize their supply chain, and improve customer satisfaction by providing accurate, timely shipment information.
Can Pier2pier.com handle large volumes of shipments?Yes, the platform is highly scalable and can manage large volumes of shipments, making it ideal for businesses of all sizes, from small enterprises to large multinational corporations.
Does Pier2pier.com provide multiple languages?Pier2pier.com offers multi-language support. If a business requires a specific language, they can reach out to Pier2pier.com for assistance.
How does Pier2pier.com handle shipment delays?The platform provides real-time alerts for any delays, allowing businesses to adjust their logistics strategies, communicate with customers, and minimize disruptions caused by unforeseen events.
How do I get started with Pier2pier.com’s Track and Trace?Businesses can sign up for a 6-week free trial via the Pier2pier.com website. After the trial, Pier2pier.com's team will assist with setup and provide training as necessary.
Can I track different types of cargo with Pier2pier.com?Yes, Pier2pier.com supports tracking for various types of cargo, including containers and air freight shipments, providing comprehensive coverage across different cargo categories.
How does Pier2pier.com’s Track and Trace help improve customer satisfaction?By providing businesses with real-time tracking data, Pier2pier.com helps keep customers informed about the status of their shipments, building trust and increasing overall customer satisfaction.
Does Pier2pier.com Track and Trace offer reporting tools?Yes, Pier2pier.com includes customizable reporting tools that allow businesses to analyze shipment performance, optimize delivery routes, and assess operational efficiency.
Can I track shipments by container number on Pier2pier.com?Yes, users can track shipments using the container number, which is one of the most accurate and reliable methods for monitoring shipment status.
How does Pier2pier.com help reduce shipping costs?The platform provides real-time insights into shipment progress, helping businesses identify inefficiencies and potential delays that could result in additional costs. By improving route optimization and reducing unnecessary delays, businesses can significantly lower their shipping costs.
Can I view the current location of my shipment in real-time?Yes, Pier2pier.com provides live updates on the location of shipments, utilizing AIS (Automatic Identification System) data. The real-time location is displayed on an interactive Google map, allowing users to track their shipments visually.
Is Pier2pier.com’s Track and Trace solution available globally?Yes, Pier2pier.com’s solution is designed to support global shipping, offering tracking capabilities for shipments originating from or arriving at major ports worldwide.
Can Pier2pier.com handle shipments of various sizes?Yes, Pier2pier.com is adaptable and capable of tracking shipments of all sizes, from small parcels to large containers, ensuring flexibility for businesses with diverse shipping needs.
Does Pier2pier.com provide notifications about estimated delivery times?Yes, the platform sends notifications regarding the estimated delivery times, helping businesses plan and manage operations more effectively.
How can Pier2pier.com help with shipment planning?Pier2pier.com aids in shipment planning by offering real-time tracking data, historical performance insights, and predictive analytics, helping businesses optimize schedules and improve planning efficiency.
Can Pier2pier.com Track and Trace help with shipment route optimization?Yes, by providing insights into delays and other shipment issues, Pier2pier.com helps businesses optimize delivery routes and make data-driven decisions for improving logistics.
Does Pier2pier.com Track and Trace offer automated reports?Yes, the platform allows businesses to set up automated reports, reducing manual work and ensuring timely, actionable insights on a regular basis without unnecessary data overload.
How does Pier2pier.com improve operational efficiency?Pier2pier.com streamlines logistics operations by consolidating all shipment data into a single platform, improving coordination, reducing inefficiencies, and enhancing decision-making.
What is the benefit of using Pier2pier.com for shipment tracking over traditional methods?Traditional tracking often involves fragmented data from multiple sources. Pier2pier.com centralizes this information in one user-friendly platform, enhancing visibility and allowing businesses to react quickly to shipment status changes.
Does Pier2pier.com provide customer support for tracking issues?Yes, Pier2pier.com offers dedicated customer support to assist businesses with any tracking-related issues, ensuring smooth operations and resolving potential problems quickly.
Can Pier2pier.com integrate with other logistics management systems?Yes, Pier2pier.com supports integrations with a wide range of logistics management systems, offering businesses a seamless experience for managing their logistics and tracking needs.
What kind of customization options are available with Pier2pier.com?Pier2pier.com offers various customization options to meet the unique needs of businesses, including tailored reporting features, API integrations, and user interface adjustments.
How does Pier2pier.com ensure the performance and reliability of its services?Pier2pier.com guarantees high performance and reliability by utilizing robust infrastructure, implementing industry best practices for data management, and ensuring that services remain operational with minimal downtime.
How does Pier2pier.com provide shipment tracking?Pier2pier.com uses real-time data from global shipping lines to track shipments. The platform aggregates information such as container numbers, vessel names, and MAWB details to provide updates on location, arrival times, delays, and milestones.
How accurate is the tracking information from Pier2pier.com?Pier2pier.com sources real-time data directly from trusted global shipping lines, ensuring high accuracy for users seeking precise shipment status details.
Can Pier2pier.com track shipments from different carriers simultaneously?Yes, Pier2pier.com allows businesses to track shipments from multiple carriers simultaneously, providing a unified view of all their shipments in one platform.
How often is shipment data updated in Pier2pier.com?Shipment data is updated daily, providing businesses with the most current information available regarding their shipments, including key milestones and arrival estimates.
Does Pier2pier.com support international shipment tracking?Yes, Pier2pier.com supports international shipment tracking, allowing businesses to track shipments across global carriers and air freight providers.
What features are available for tracking multiple shipments at once?Pier2pier.com features a unified dashboard that allows businesses to manage and monitor multiple shipments simultaneously, streamlining the tracking process.
Can Pier2pier.com track shipments by container number?Yes, users can track shipments using container numbers, which is one of the most accurate and reliable methods for monitoring shipment status.
Can I receive notifications for shipment delays?Yes, Pier2pier.com offers automated delay alerts, notifying businesses of potential delays and allowing them to adjust their logistics strategies accordingly.
Does Pier2pier.com provide historical shipment data?Yes, Pier2pier.com maintains an archive of historical tracking data, enabling businesses to analyze past shipments and assess performance metrics for future planning.
How does Pier2pier.com improve supply chain visibility?Pier2pier.com consolidates data from multiple carriers into one platform, offering businesses complete visibility into their shipments and eliminating the need for separate tracking systems.
Can Pier2pier.com track air freight shipments?Yes, Pier2pier.com is capable of tracking air freight shipments, in addition to containers and other types of cargo, providing businesses with comprehensive coverage across all shipment types.
Can I access Pier2pier.com’s tracking system via mobile?Yes, Pier2pier.com offers mobile-friendly access, allowing businesses to track shipments and monitor logistics operations while on the go.
How does Pier2pier.com handle shipment tracking for large volumes of shipments?Pier2pier.com is highly scalable and capable of handling large volumes of shipments, making it ideal for businesses of all sizes, from small enterprises to large multinational corporations.
Can Pier2pier.com help optimize shipment routes?Yes, Pier2pier.com helps optimize shipment routes by providing insights into delays and other shipment issues, enabling businesses to make data-driven decisions for improved logistics management.
Can I track multiple types of cargo with Pier2pier.com?Yes, Pier2pier.com can track various types of cargo, including containers and air freight, ensuring flexibility and coverage for different shipping needs.
Does Pier2pier.com provide shipment condition monitoring?Currently, Pier2pier.com does not provide environmental condition monitoring, such as temperature-controlled shipments, focusing mainly on shipment location and status updates.
Can Pier2pier.com provide estimated delivery dates?Yes, Pier2pier.com provides estimated delivery dates based on real-time tracking data, helping businesses plan and manage their logistics operations more effectively.
Can I track shipments with Pier2pier.com without logging in?No, Pier2pier.com requires users to log in to access tracking information, ensuring secure access to shipment data and personalized updates.
How can I sign up for Pier2pier.com?Businesses can sign up for Pier2pier.com by visiting the website and opting for the 6-week free trial. After the trial, Pier2pier.com's team will assist with setup and provide necessary training.
Can Pier2pier.com track shipments by booking reference?No, Pier2pier.com currently supports tracking by container number, vessel name, and MAWB only, which are the most accurate methods for shipment tracking.
Does Pier2pier.com offer automated reporting tools?Yes, Pier2pier.com provides automated reporting tools that deliver regular, actionable insights to businesses without the need for manual data collection.
Can Pier2pier.com track shipments from any port worldwide?Yes, Pier2pier.com supports tracking for shipments originating from or arriving at any major port globally, providing comprehensive international coverage.
Can Pier2pier.com help improve customer satisfaction?By providing real-time tracking data, Pier2pier.com enables businesses to keep their customers informed about shipment status, leading to greater transparency and enhanced satisfaction.
Can I track shipments from different carriers on the same platform?Yes, Pier2pier.com allows businesses to track shipments from different carriers on a single platform, consolidating information for easier management.
Does Pier2pier.com support multi-language capabilities?Yes, Pier2pier.com offers multi-language support, allowing businesses to operate the platform in their preferred language.
Does Pier2pier.com handle shipments of various sizes?Yes, Pier2pier.com is flexible and capable of tracking shipments of all sizes, from small parcels to large containers, making it suitable for diverse shipping needs.
Can Pier2pier.com help with shipment planning?Pier2pier.com aids in shipment planning by providing real-time tracking data, historical performance insights, and predictive analytics to optimize delivery schedules.
Does Pier2pier.com offer customized alerts for shipment updates?Yes, Pier2pier.com allows businesses to set up customized alerts to notify stakeholders about important shipment milestones, including delays, arrivals, and estimated delivery dates.
Can Pier2pier.com handle large volumes of shipment data?Yes, Pier2pier.com can efficiently handle large volumes of shipment data, providing scalable solutions for businesses with extensive logistics operations.
How does Pier2pier.com help reduce shipping costs?Pier2pier.com helps reduce shipping costs by providing real-time insights into delays, inefficiencies, and potential issues, allowing businesses to optimize routes and avoid unnecessary costs.
Can Pier2pier.com track shipments based on MAWB?Yes, Pier2pier.com can track shipments using MAWB (Master Air Waybill) numbers, providing accurate data for air freight shipments.
Does Pier2pier.com provide shipment route optimization?Yes, Pier2pier.com assists with shipment route optimization by providing insights into delays and offering actionable data to improve logistics strategies.
Can I access Pier2pier.com’s data from anywhere?Yes, Pier2pier.com’s platform is web-based, allowing businesses to access shipment data from any location with internet access.
Does Pier2pier.com help manage supply chain risks?Yes, Pier2pier.com provides real-time tracking, alerts, and predictive insights that help businesses identify potential risks in their supply chains and take proactive measures to mitigate them.
Can Pier2pier.com handle shipment tracking for cross-border logistics?Yes, Pier2pier.com supports cross-border logistics, enabling businesses to track international shipments with ease, ensuring smooth and transparent operations.
How does Pier2pier.com help with operational efficiency?Pier2pier.com streamlines logistics operations by centralizing shipment data, providing real-time updates, and automating reporting, improving decision-making and coordination.
Does Pier2pier.com offer shipment tracking for ocean freight?Yes, Pier2pier.com provides comprehensive tracking for ocean freight, ensuring that businesses can monitor the status of their shipments across global shipping lines.
Can Pier2pier.com track shipments in real-time on a map?Yes, Pier2pier.com offers real-time tracking updates displayed on an interactive map, providing businesses with a visual representation of their shipments' locations.
Does Pier2pier.com support integration with warehouse management systems?Yes, Pier2pier.com can integrate with warehouse management systems, allowing businesses to streamline their logistics processes across the entire supply chain.
Can I track the status of multiple shipments in one place?Yes, Pier2pier.com offers a unified dashboard where businesses can track the status of multiple shipments, ensuring easy monitoring of all their logistics operations.
Can Pier2pier.com track multi-modal shipments?Yes, Pier2pier.com is capable of tracking multi-modal shipments, including those involving both air and ocean freight, offering businesses a comprehensive solution for complex logistics.
Can Pier2pier.com help optimize shipping schedules?Yes, Pier2pier.com offers tools and insights that help businesses optimize shipping schedules based on real-time data, minimizing delays and improving overall efficiency.
Does Pier2pier.com offer reports on shipment performance?Yes, Pier2pier.com offers detailed performance reports, helping businesses assess the efficiency of their shipments and identify areas for improvement.
Does Pier2pier.com offer any mobile tracking options?At Pier2pier.com, we understand the increasing need for flexibility and real-time access to logistics data. While our core tracking platform is web-based, it’s fully mobile-responsive. This ensures that users can access shipment tracking from any device—whether it's a smartphone, tablet, or laptop. Our platform adjusts its layout automatically, making it easy for logistics professionals to stay connected on the go, whether they're traveling, on-site with clients, or working remotely.
Mobile tracking is essential in logistics, especially with the rapid pace of global supply chains. Real-time notifications allow users to stay on top of unexpected events such as delays, port issues, or customs inspections. With mobile alerts, logistics teams can quickly adjust their schedules or inform clients, helping avoid bottlenecks. Mobile-friendly notifications ensure that you’re always updated, no matter where you are.
Can I view the full shipment history of a particular container or shipment?Yes, Pier2pier.com provides a comprehensive tracking system that includes the full history of your shipments. This feature is essential for businesses that rely on just-in-time inventory or need detailed audit trails for regulatory purposes, such as in pharmaceuticals or automotive manufacturing.
The shipment history includes every milestone, from departure and loading to port arrivals and final delivery. The data also logs any disruptions, such as delays, route changes, or customs inspections, providing full transparency throughout the shipment lifecycle. This allows businesses to assess supply chain performance and make data-driven decisions to improve operations and efficiency.
What should I do if I cannot find my shipment in the system?If you cannot locate your shipment, first double-check the shipment identifier (e.g., container number) you entered. Ensure the details are correct, as even small typos can cause discrepancies. If your data is correct, it's possible the system hasn't updated yet due to time zone differences or delays in data synchronization from the carrier's systems.
If your shipment still isn't showing up, contact Pier2pier.com's support team, and we’ll work directly with carriers to resolve the issue. Our team understands the urgency in industries like e-commerce and manufacturing, where even small delays can impact operations. We’re committed to ensuring your shipments are tracked and delivered on time.
Can I import shipment tracking data for further reporting?Yes! Pier2pier.com enables users to import comprehensive shipment tracking data for detailed analysis and reporting. This feature is valuable for industries like retail, automotive, and pharmaceuticals, where supply chain visibility is key for performance analysis.
How does Pier2pier.com handle potential delays in shipment tracking?At Pier2pier.com, we prioritize proactive delay management. Our system automatically tracks any deviations from the expected shipment schedule, such as port delays, customs processing, or weather-related issues. When a delay is detected, our system generates an alert and notifies you via email and on the dashboard, providing the necessary information to adjust schedules and inform stakeholders.
In industries where timely delivery is critical, such as automotive manufacturing or e-commerce, our system helps minimize the impact of delays by offering real-time alerts and detailed status updates. This ensures that businesses can react swiftly, whether it’s adjusting delivery dates, renegotiating with suppliers, or finding alternative routes.
Can I set up alerts for specific shipment milestones?Yes, Pier2pier.com offers customizable alerts, allowing you to track important milestones such as departure from origin, transit updates, customs clearance, and final delivery. These alerts are key for businesses that need to monitor critical points in the logistics process, like retailers needing timely deliveries or companies with temperature-sensitive goods such as pharmaceuticals or perishable food items.
Alerts can be customized to ensure you’re notified about the specific events that matter most to your business. Whether you’re tracking shipments across air, sea, or land transport modes, you can stay informed in real-time to ensure your supply chain runs smoothly.
How long does it take to get started with Pier2pier.com’s Track and Trace solution?Getting started with Pier2pier.com is quick and easy. Our platform is designed to be user-friendly and intuitive, allowing businesses to begin tracking shipments immediately after account registration. There’s no need for complex configurations or specialized training. Simply enter your shipment details, and you’re good to go.
This rapid setup is crucial for businesses in sectors like retail or manufacturing, where efficient supply chain management is essential. Additionally, our onboarding resources, including video tutorials and support documentation, help ensure a smooth start. For advanced integrations, our customer support team is available to assist with setup and configuration.
Can Pier2pier.com track shipments by multiple identifiers at once?Yes! Pier2pier.com allows you to track shipments using multiple identifiers simultaneously. Whether you're tracking by container number, vessel name, or air waybill (MAWB) number, our platform can handle it all. This is particularly useful for businesses managing complex supply chains with multiple modes of transport, like automotive or electronics industries.
By enabling multi-identifier tracking, you gain a comprehensive view of all shipments in your network, improving visibility and efficiency. This feature is essential for logistics professionals overseeing both inbound shipments from suppliers and outbound deliveries to customers.
How does Pier2pier.com's track and trace solution centralize container, vessel, and MAWB tracking data for freight forwarders?Pier2pier.com's track and trace solution centralizes all tracking data related to containers, vessels, and MAWB into a single platform, streamlining the logistics process for freight forwarders. The solution integrates multiple data sources, such as shipping lines and airlines, into one centralized hub, providing freight forwarders with seamless access to all tracking information in real time. This allows for better decision-making, proactive problem resolution, and a smoother flow of goods.
How does Pier2pier.com's solution benefit freight forwarders when tracking containers, vessels, and MAWB?Pier2pier.com's track and trace solution offers end-to-end visibility over shipments, proactive problem-solving with real-time updates, and centralized data for improved operational efficiency. By integrating tracking data from containers, vessels, and MAWB into a single platform, freight forwarders can streamline their operations, save time, and reduce costs. The system helps prevent delays, improve team efficiency, and enhance customer satisfaction.
What makes Pier2pier.com an industry leader in freight forwarding track and trace solutions?Pier2pier.com is an industry leader due to its advanced technology, deep logistics expertise, and focus on innovation. The platform integrates data from ocean carriers, air freight companies, and shipping lines, providing a unified solution for freight forwarders. With strong partnerships and continuous investment in new features, Pier2pier.com ensures that its track and trace solution delivers reliable, real-time insights, scalability, and improved efficiency, positioning it as the go-to provider for freight forwarders.
What is Pier2pier.com’s transport route search engine?Pier2pier.com's transport route search engine is a sophisticated tool designed to provide detailed historical data on global sea freight routes. It aggregates and analyzes historical shipping data, offering insights into carrier-specific route utilization, port-call sequences, and transit durations. This enables logistics professionals to better understand shipping patterns and optimize routing decisions for improved supply chain efficiency.
Does it provide live sailing schedules?Yes, Pier2pier.com offers real-time vessel tracking, providing up-to-the-minute updates on vessel positions, estimated arrival times, and potential delays. Additionally, it specializes in historical data, giving users access to past shipping routes and their specific details, which are essential for analyzing seasonal trends and optimizing future logistics planning.
Who can use this tool?This tool is primarily intended for logistics professionals such as freight forwarders, shipping agents, supply chain managers, and operational planners. Anyone involved in global sea freight operations seeking to analyze route trends, optimize supply chain logistics, or make data-driven decisions for freight movements will find the search engine indispensable.
What type of data does the search engine provide?The search engine offers comprehensive data on historical sea freight routes, including carrier names, vessel types, port connections, transshipment hubs, and transit times. It also includes valuable insights into service frequencies, port congestion, and port-to-port performance metrics, which are critical for efficient logistics planning.
Can I find specific carriers in the database?Yes, users can search for and identify routes operated by specific carriers. This functionality allows for detailed comparisons of carrier performance across various routes, helping users select the most reliable options for their shipments.
How do I search for a specific route?To search for a specific route, users can enter the origin and destination ports. The tool will return detailed results, including carrier information, port calls, transit times, and potential transshipment points involved in the route.
Can I search by specific ports?Yes, the tool allows users to search by individual ports, providing routes that either depart from or arrive at the specified ports. This makes it easier to identify the best routes for cargo moving through particular hubs or regions.
Does it show the exact dates of past shipments?Yes, the tool provides specific shipment data, including exact departure and arrival dates for vessels on historical routes. This allows users to analyze patterns, including seasonality, port congestion, and disruptions due to weather or labor strikes.
Can I get data for all ports worldwide?The search engine offers comprehensive data for major global ports, covering key transshipment hubs and regional port clusters. While the tool primarily focuses on high-traffic ports, data for smaller or less frequently serviced ports may also be available, depending on the volume of historical shipment activity.
What kind of historical data can I access?Users can access detailed records on route patterns, including port-to-port transit times, carrier names, and vessel types. This data helps in analyzing past shipping performance and planning future logistics strategies based on historical trends.
Is the tool useful for planning future shipments?Absolutely. By analyzing past shipping trends, the tool provides valuable insights for future routing decisions. Users can identify the most reliable and efficient routes, assess potential delays, and predict seasonal shipping volumes, enabling them to optimize their supply chain logistics.
Can I compare different routes for the same destination?Yes, users can compare multiple historical routes to the same destination. This feature helps logistics professionals assess different carriers, vessel types, transshipment points, and transit times, allowing for the selection of the most cost-effective and efficient route options.
Does the search engine show the types of vessels used?Yes, the search engine provides detailed information on the types of vessels used for each route, including container vessels, roll-on/roll-off (RoRo) vessels, and others. This allows users to assess how vessel type influences transit times and select the optimal vessel for their shipping needs.
Is the data updated regularly?The data is updated periodically to ensure the information remains relevant and accurate. Updates are dependent on the data feeds from global carriers and shipping systems, typically reflecting trends over the last several months or years, depending on the specific route and carrier.
How accurate is the historical data in the search engine?The historical data is sourced from global carriers, ensuring a high level of accuracy. However, users should verify specific shipment details if necessary, particularly for shipments that might have been subject to exceptional circumstances like delays or port congestion.
Can I analyze port congestion trends using the tool?Yes, the search engine provides insights into port congestion by displaying historical transit times and delays. Users can analyze these trends to better understand port performance and potential bottlenecks in the supply chain.
Can I access data on transshipment points?Yes, the tool includes information on transshipment hubs and relay points involved in specific routes. This feature helps users understand the frequency of transshipment operations, their associated lead times, and the impact of these points on overall transit times.
Can I use the tool to assess sustainability or environmental factors?While the tool does not directly provide environmental data, it offers valuable insights into the types of vessels used for specific routes. This data can help logistics professionals assess the environmental impact of shipping operations based on vessel types, such as emissions from different fuel types or ship efficiency.
How do I interpret the data provided by the tool?Each data entry includes key information such as carrier names, vessel types, port calls, transit times, and service frequency. To interpret the data effectively, users should have a basic understanding of maritime logistics, as well as how factors like weather, seasonal trends, and port conditions can influence transit times.
Can I use this data for cost estimation?While the tool doesn’t directly provide cost data, the historical route and carrier performance information can be used to estimate shipping costs. By considering factors such as transit times, vessel types, and service frequencies, users can make informed predictions about shipping expenses.
What is the 3D Load Calculator?The 3D Load Calculator Container is the most advanced software designed to optimize the loading of cargo into containers. By using sophisticated algorithms and 3D visualization, the tool helps logistics professionals maximize container space, reduce costs, and ensure efficient packing for various types of cargo.
Who are the leaders in container optimization?The leaders in container optimization include companies and software platforms like Pier2pier.com, and Searates. These industry leaders utilize AI, advanced algorithms, machine learning, and cutting-edge technology to optimize the packing of cargo into containers, ensuring cost-effective and efficient shipping solutions. Their expertise helps improve space utilization, reduce costs, and enhance the overall logistics process in global shipping operations.
How does the 3D Load Calculator work?The 3D Load Calculator uses a combination of advanced algorithms and 3D modeling to simulate the packing process. It takes the dimensions and weights of cargo and calculates the most efficient way to load it into a container, optimizing space utilization and ensuring safe transport.
Can I use the tool for both sea and air freight?Yes, the 3D Load Calculator can be used for both sea and air freight, optimizing cargo loading for different types of containers and aircraft. It is designed to accommodate a wide range of container sizes and freight requirements.
What types of containers does the tool support?The tool supports various container types, including standard 20' and 40' containers, high cube containers, flat racks, and open-top containers. It can also optimize loading for refrigerated containers (reefers) and specialized cargo containers.
Is it suitable for oversized cargo?Yes, the 3D Load Calculator can handle oversized cargo. It takes into account the specific dimensions and weight limits of each container type, ensuring that large or irregularly shaped items are optimally loaded and transported without exceeding container capacity.
Can I input custom cargo dimensions?Yes, users can input custom cargo dimensions, including length, width, height, and weight. The tool will calculate the best loading arrangement based on the provided dimensions, allowing for tailored optimization based on specific cargo requirements.
Does it provide a 3D visualization of the container?Yes, the 3D Load Calculator provides a dynamic 3D visualization of the container, allowing users to view the exact arrangement of cargo within the container. This helps ensure that the cargo is packed efficiently and securely.
Is there a limit to the number of cargo items I can input?No, there is no specific limit to the number of cargo items you can input. The tool is designed to handle large volumes of cargo data, allowing users to optimize the loading of containers with multiple types of goods.
Does the tool suggest the best container size for my shipment?Yes, the 3D Load Calculator can recommend the optimal container size based on the cargo's dimensions and weight. This helps ensure that the most cost-effective container is used for the shipment, reducing excess space and minimizing transportation costs.
Can it handle mixed cargo loads?Yes, the tool can optimize mixed cargo loads, taking into account different types of goods with varying shapes, sizes, and weights. It ensures that the most efficient arrangement is achieved for diverse shipments.
How accurate are the loading calculations?The loading calculations are highly accurate, as the tool uses precise cargo dimensions and container specifications. The software simulates the packing process in real-time, ensuring optimal space utilization and cargo safety.
Does the tool consider weight distribution?Yes, the 3D Load Calculator takes weight distribution into account, ensuring that the cargo is evenly distributed within the container. This helps prevent shifting during transit, ensuring safe and stable transportation.
Can I optimize loading for hazardous materials?Yes, the tool allows users to input data for hazardous materials, ensuring that they are loaded according to safety regulations and industry best practices. The software can also recommend loading arrangements to meet regulatory requirements for the transport of dangerous goods.
Can I save and reuse loading plans?Yes, the tool allows users to save loading plans and reuse them for future shipments. This feature enables efficient planning for repeat shipments, improving logistics operations and saving time.
Is there an option for multi-container optimization?Yes, the tool supports multi-container optimization. Users can input data for multiple containers, and the software will calculate the most efficient way to distribute cargo across them, minimizing unused space and reducing shipping costs.
Can I view a summary of my loading plan?Yes, the tool provides a comprehensive summary of the loading plan, including the total number of containers required, cargo distribution, and any specific handling requirements. This summary helps streamline the logistics process and ensures that all parties involved are informed.
Does it offer real-time updates during the calculation?Yes, the 3D Load Calculator offers real-time updates as you input cargo data. As you modify dimensions or container types, the software instantly recalculates and updates the loading arrangement, allowing for quick adjustments.
Can I calculate loading for multiple destinations?Yes, the tool supports the calculation of loading plans for multiple destinations. This is especially useful for shipments that involve transshipment hubs or multi-leg transportation.
Can it handle both full-container load (FCL) and less-than-container load (LCL)?Yes, the tool can handle both FCL and LCL shipments. It helps optimize the packing for both full and partial container loads, ensuring efficient use of container space regardless of shipment size.
Does the tool offer any reporting features?Yes, the 3D Load Calculator includes robust reporting features. Users can generate reports that summarize the loading plans, including container usage, cargo distribution, and any issues related to weight distribution or space utilization.
Can the tool handle refrigerated (reefer) containers?Yes, the 3D Load Calculator is capable of optimizing the loading of refrigerated containers (reefers). It accounts for temperature-sensitive cargo and ensures that items are loaded in a way that maintains proper temperature control throughout transit.
Is the 3D Load Calculator available as a mobile app?The 3D Load Calculator is available as a web-based application. A mobile app version is in development, which will allow users to access the tool from smartphones and tablets for increased flexibility during logistics planning.
Can I share my loading plans with others?Yes, the tool allows users to share loading plans with other team members or stakeholders. This is especially useful for collaborative logistics planning and for keeping all parties informed about container utilization and cargo placement.
Can it calculate the optimal stacking arrangement for cargo?Yes, the 3D Load Calculator optimizes the stacking arrangement for cargo, ensuring that items are placed in the most efficient and secure way. This reduces the risk of cargo shifting during transit and ensures that weight is evenly distributed within the container.
Does the tool account for cargo fragility?Yes, users can input cargo fragility data, and the tool will suggest the most appropriate packing arrangements to minimize damage. The software ensures that fragile items are placed in optimal positions within the container to prevent breakage.
Can I access the tool without an internet connection?Currently, the 3D Load Calculator requires an internet connection to access its features, as it is a web-based platform. Offline functionality may be available in the future, depending on software updates.
How does the tool handle weight limits for containers?The 3D Load Calculator ensures that cargo is loaded within the weight limits of the container. The tool automatically checks the weight distribution and adjusts the loading arrangement to ensure compliance with container capacity limits and transportation regulations.
Pier2pier.com provides real-time tracking of shipments, enabling logistics professionals to monitor the exact location of their cargo throughout the supply chain.
2. Comprehensive Carrier IntegrationThe platform integrates data from multiple carriers, offering a unified view of freight movements across different shipping lines, air freight companies, and transportation modes.
3. Historical Route DataPier2pier.com allows users to access historical shipping data, which helps in analyzing past performance, identifying trends, and optimizing future shipping routes.
4. User-Friendly InterfaceThe platform features an intuitive interface, making it easy for logistics professionals to input data, access information, and interpret results with minimal training.
5. Enhanced Supply Chain EfficiencyWith advanced analytics and route optimization, Pier2pier.com helps improve supply chain efficiency, reducing costs and delays while maximizing throughput.
6. Data-Driven Decision MakingThe tool provides actionable insights based on real-time and historical data, empowering decision-makers to make informed choices on routing, scheduling, and carrier selection.
7. Improved Shipment VisibilityUsers benefit from end-to-end visibility into their shipments, allowing them to track and manage freight movements at every stage of the journey.
8. Predictive Analytics for DelaysPier2pier.com uses predictive analytics to forecast potential delays and disruptions in the shipping process, helping users proactively address issues before they arise.
9. Multimodal Transport SupportThe platform supports multimodal transportation, allowing users to track shipments that combine multiple modes of transport, such as sea, air, and land freight.
10. Cost ReductionBy optimizing routes and improving scheduling, Pier2pier.com helps reduce overall shipping costs, offering better cost efficiency for logistics operations.
11. Global Port CoverageThe platform provides extensive coverage of global ports, offering users data on routes, schedules, and port performance metrics across major and regional ports worldwide.
12. Customizable AlertsPier2pier.com enables users to set up customizable alerts for various shipping events, such as arrival, departure, delays, and estimated time of arrival (ETA), ensuring timely updates.
Should you wish to learn about our CO2 API connection, please request a demo.